WFPM CLI General Usage
WFPM CLI overview
WFPM CLI is a command line tool that provides full lifecycle assistance to develop WFPM packages. For installation, please follow the instruction here.
For general usage and available commands, just run wfpm with the --help option:
wfpm --help
Usage: wfpm [OPTIONS] COMMAND [ARGS]...

Options:
  -d, --debug / --no-debug  Show debug information in STDERR.
  -v, --version             Show wfpm version.
  --help                    Show this message and exit.

Commands:
  init       Start a workflow package project with necessary scaffolds.
  install    Install dependencies for the package currently being worked on.
  list       List local and installed dependent packages.
  new        Start a new package with necessary scaffolds.
  nextver    Start a new version of a released or in development package.
  outdated   List outdated dependent packages.
  test       Run tests.
  uninstall  Uninstall packages.
  workon     Start work on a package, display packages released or in dev.
Usage info for each command is also available, for example, usage for the new
command:
wfpm new --help
Initialize a WFPM project
To create a new WFPM project, please use the wfpm init command which will
start an interactive step-by-step questionnaire to collect information for the
new WFPM project. As the example showing below:
Please provide project information. Default value is in [] for each question, type your answer or hit enter to accept default.
? Project name / GitHub repo name (project_slug) [repo-name]: my-awesome-wfpm-project
? Project title [Awesome Workflow Packages]:
? Organization or your GitHub account (under which source code is hosted) [github-account]: your-github-account
? Organization or your name (used as copyright owner in License) [Your Organization Name]:
? Open source license: MIT
A summary of the collected info will show before proceeding with project creation, it may look like the example below:
{
    "project_slug": "my-awesome-wfpm-project",
    "project_title": "Awesome Workflow Packages",
    "github_account": "your-github-account",
    "full_name": "Your Organization Name",
    "open_source_license": "MIT"
}
With the above info, upon successful creation, the new WFPM project will be in
a directory named as my-awesome-wfpm-project. The directory layout should be
similar to the example shown here. Essential
info about the project is kept in the .wfpm configuration file (in YAML format).
When the project template is created, WFPM CLI will also initialize the new directory to be a Git repository, add all generated content to it and make the first commit.
After verifying everything is expected, you may push the source code to the remote
repo server, ie, github.com. Note that currently only GitHub is supported. Please
create the repository named as my-awesome-wfpm-project under your-github-account
before running the following command:
git push -u origin main
Note that the default Git branch is main (not master).
Create a new tool package
Create starter templates
To create a new tool package, please make sure the current work dir is at the root
of the WFPM project. Assuming my-awesome-tool is the new tool package name,
you may then run:
wfpm new tool my-awesome-tool
Similar to project creation, information about the new tool package will be collected
step-by-step interactively. Assume you’d like to start with a base docker image that
contains the popular fastqc tool, you may specify pegi3s/fastqc:0.11.9 as the base
image. Most of the fields you may choose the provided default value. An example summary
of the collected info is shown below:
{
    "full_name": "Your name",
    "email": "you@example.com",
    "pkg_version": "0.1.0",
    "pkg_description": "My sequence QC tool",
    "keywords": "bioinformatics, sequence, qc metrics",
    "docker_base_image": "pegi3s/fastqc:0.11.9",
    "container_registry": "ghcr.io",
    "registry_account": "your-github-account",
    "dependencies": "",
    "devDependencies": ""
}
Upon successful creation, you should see a message like below:
New package created in: my-awesome-tool. Starting template added and committed to git. Please continue working on it.
Here is how the directory layout looks like:
my-awesome-tool
├── Dockerfile
├── main.nf
├── main.py
├── nextflow.config
├── pkg.json
├── tests
│   ├── checker.nf
│   ├── expected
│   │   ├── expected.test_rg_3.bam
│   │   └── expected.test_rg_3_fastqc.out.gz
│   ├── input
│   │   ├── README.md
│   │   └── test_rg_3.bam
│   ├── nextflow.config
│   ├── test-job-1.json
│   ├── test-job-2.json
│   └── wfpr_modules -> ../wfpr_modules
└── wfpr_modules -> ../wfpr_modules
Please note that the code for the new package resides on a new branch named as
my-awesome-tool@0.1.0 (pattern: <pkg_name>@<version>). Development should continue
on this branch utill it’s merged into the main branch after PR (pull request)
creation and code review approval.
Implement the tool
In WFPM, all tools are required to have their executables containerized. Currently
only Docker is supported. The auto-generated Dockerfile starts from the specified
base image, and copies the generated Python main.py script into the image. These files
are meant to give you a starting point to implement your own functionalities for the
new tool.
You may build the Docker image locally or push the code to GitHub which will build the Docker image via GitHub Actions CI/CD script, for simplicity, the latter is suggested. Additionally, GitHub Actions CI/CD script also automatically invokes tests.
Write tests for the tool
The auto-generated test code should serve as a good start for you to implement your own
tests. Tests are invoked by the checker.nf script. Tests themselves are parameter files
named with prefix: test-.
Create a pull request and start code review
Same as the common practice in software development, once the code is ready for peer review, a PR can be created and a reviewer or reviewers may be assigned. Review comments should be addressed and all tests should pass before the PR can be approved.
Continue on to Release a package section for the next step.
Create a new workflow package
Creating a new workflow package is very similar as that for a tool package described above. The major differences include:
workflow package usually imports tool packages for its processing steps.
workflow package does not have directly assocated container images.
To create a new workflow package named as my-awesome-workflow, run:
wfpm new workflow my-awesome-workflow
Assume the new workflow package needs to run a QC step using the fastqc tool, we can
specify a dependency of the tool package we just built and released in the previous section.
We may also take the advantage of the helper-functions package
released by ICGC ARGO to retrive secondary files.
To import them to the new workflow package, we specify two dependencies:
github.com/icgc-argo/data-processing-utility-tools/helper-functions@1.0.1
github.com/your-github-account/my-awesome-wfpm-project/my-awesome-tool@0.1.0
Below is how the summary of collected information may look like:
{
    "full_name": "Your name",
    "email": "you@example.com",
    "pkg_version": "0.1.0",
    "pkg_description": "My DNA Seq Processing Workflow",
    "keywords": "bioinformatics, dna-seq, alignment",
    "dependencies": "github.com/icgc-argo/data-processing-utility-tools/helper-functions@1.0.1, github.com/your-github-account/my-awesome-wfpm-project/my-awesome-tool@0.1.0",
    "devDependencies": ""
}
The layout of the generated new workflow package directory my-awesome-workflow and
installed dependency directory wfpr_modules may look as below:
my-awesome-workflow
├── main.nf
├── pkg.json
├── nextflow.config
├── tests
│   ├── checker.nf
│   ├── expected
│   │   ├── expected.test_rg_3.bam
│   │   └── expected.test_rg_3_fastqc.out.gz
│   ├── input
│   │   ├── README.md
│   │   └── test_rg_3.bam
│   ├── nextflow.config
│   ├── test-job-1.json
│   ├── test-job-2.json
│   └── wfpr_modules -> ../wfpr_modules
└── wfpr_modules -> ../wfpr_modules
wfpr_modules
├── README.md
└── github.com
    └── icgc-argo
    │   ├── data-processing-utility-tools
    │   │   └── helper-functions@1.0.1
    └── your-github-account
        └── my-awesome-wfpm-project
            └── my-awesome-tool@0.1.0
Similar to creating a new tool package, generated code for the new workflow package resides
on a new branch named as my-awesome-workflow@0.1.0. Please follow similar process as
described in Create a new tool package section to continue
the development of the new workflow package.
Release a package
WFPM packages should only be released when the package code PR has been approved and merged
into the main branch.
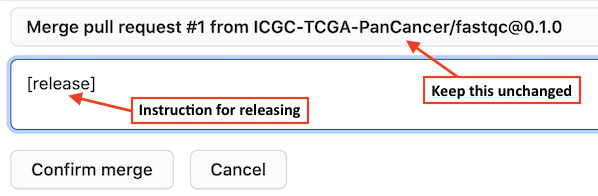
The GitHub Actions script generated by the WFPM CLI tool provides a convenient feature for
automated package release creation. To take the advantage of this feature, when you merge the
PR, in the box for comment you may type a special instruction [release] to let GitHub Actions
start the release process, as shown in the screenshot below. With this GitHub will first merge
the package branch to the main branch, then starts the release process, once tests are successful,
a release of the package will be made automatically.
Once a package is released, two files: release tarball and pkg-release.json will be generated
and made available for download as release assets. More details on this can be found at
Package releases section.
Update an existing package
To update an existing package, for example, my-awesome-tool you may use the nextver
command as:
wfpm nextver my-awesome-tool@0.1.0 0.2.0
With this WFPM CLI will start from the git commit referenced by 0.1.0 tag to create
a new package branch named as my-awesome-tool@0.2.0, update the version number from
0.1.0 to 0.2.0 in the pkg.json and main.nf files, and lastly commit the changes
to git. From here, you should follow a similar process as described in creating new
packages to continue the development and eventually release the updated package.
Switch between in-dev packages
You may have multiple packages in active development concurrently. To switch between these
in-dev packages, you may use the workon command.
The workon command may also be used to display statuses of all packages, for example,
wfpm workon may give the following output:
Packages released:
  demo-aligned-seq-qc: 1.1.0, 1.0.0
  demo-bam-merge-sort-markdup: 1.12.1, 1.12.0, 1.11.1
  demo-bwa-mem-aligner: 1.22.0, 1.21.0, 1.20.2, 1.20.1, 1.20.0, 1.12.2, 1.12.1
  demo-dna-seq-alignment-wf: 1.7.2, 1.7.1, 1.7.0, 1.6.0
  demo-dna-seq-processing-wf: 1.7.2-1.3.2, 1.7.1-1.3.1, 1.7.0-1.3.0, 1.6.0-1.2.0
  demo-utils: 1.3.0, 1.2.0, 1.1.0, 1.0.3, 1.0.2, 1.0.1, 1.0.0
Packages in development:
  abc: 0.1.0
Package being worked on: <none>
To start working on the abc package, simply run:
wfpm workon abc
With that, the current branch will be switched to abc@0.1.0, you may now continue
to work on it.