WFPM: WorkFlow Package Manager
WorkFlow Package Manager - Overview
The WFPM CLI is a command line tool for workflow package authoring and management, it’s developed in
Python and runs on a Linux or Mac OS environment. WFPM CLI provides assistance to write shareable/reusable
workflow packages. A package can include one or more of these items: a single step tool
(aka process in Nextflow), a function or a workflow with multiple steps
chained together.
We get a lot of inspiration from NPM (node package manager), which is one of the most successful package mangement systems. The bioinformatics workflow development community would greatly appreciate something like NPM to facilitate and accelerate collaborative development via reusable packages.
NOTE: WFPM CLI is in active development. More features, documentation and tutorials are coming.
Documentation: https://wfpm.readthedocs.io
Source code: https://github.com/icgc-argo/wfpm
Blog: Build workflows collaboratively using reusable and shareable packages
Best practices for scientific workflow development
Reproducible - same input, same code, same result
containerize all software tools (including scripts, binary executables) and specific OS environment
tag every image build and associate it with workflow source code release
Portable - run on different platforms, by different users
containerize all software tools (containerization appeared again, it is a good friend :blush:)
use cross-platform workflow languages and orchestration systems, eg, Nextflow, WDL etc
Composable - enable collaborative development
break down big tasks into small tasks (each carried out by a small software tool)
one tool per container image
version and release independently every tool and its associated container image
a released tool is immutable and can be imported into any workflow where it is needed
a workflow can also be imported as sub-workflow to build a larger workflow
similar to tools, workflows are versioned, immutable once released
Findable - easy to find by research community members
register components and workflows in public tool registries, such as Dockstore, BioContainers etc
release workflow source code via GitHub Releases
Testable - deliver with high confidence
must have tests for every tool, component and workflow
configure and enable continuous integration testing
ICGC ARGO workflow implementation
Sometime around August 2019, ICGC ARGO started to experiment a modular approach to create workflows using individual analytic tools as reusable building blocks with each tool completely self-contained and independently developed, tested and released. As each tool being fairly small and well decoupled from others, it gave the team high confidence in developing and delivering the tools. Importing a specific version of a tool into a workflow codebase was extremely easy, we were able to reuse same tools in different workflows (residing in different code repositories) for common steps without duplicating a single line of code. In subsequent months, prototyping and testing assured us this was the right approach. Eventually, the aforementioned best practices were established, following which four ICGC ARGO production workflows have been implemented:
Before having the WFPM CLI tool, a development procedure was followed manually to ensure adherence to the best practices, which was undoubtedly cumbersome and error-prone. Aimed to provide maximized automation and development productivity, the WFPM CLI tool is able to generate templates that include starter workflow code, code for testing, and GitHub Actions code for automated continuous integration (CI) and continuous delivery (CD). We expect WFPM to significantly lower the barriers for scientific workflow developers to adopt the established best practices and accelerate collaborative workflow development within the ICGC ARGO community and beyond.
Installation
Prerequisites
Please ensure the following prerequisites are met before moving on to installation.
python >= 3.6
pip >= 20.0 (only required for installation)
bash >= 3.2
git >= 2.0
nextflow >= 20.10
docker >= 19.0
Install WFPM CLI with only a single command
pip install wfpm
To update to the latest version, run pip install --upgrade wfpm
To show usage information of WFPM CLI, run wfpm --help, or simply wfpm
Demo use cases
We present here step-by-step instructions how to use wfpm to create Nextflow DSL2 workflow packages.
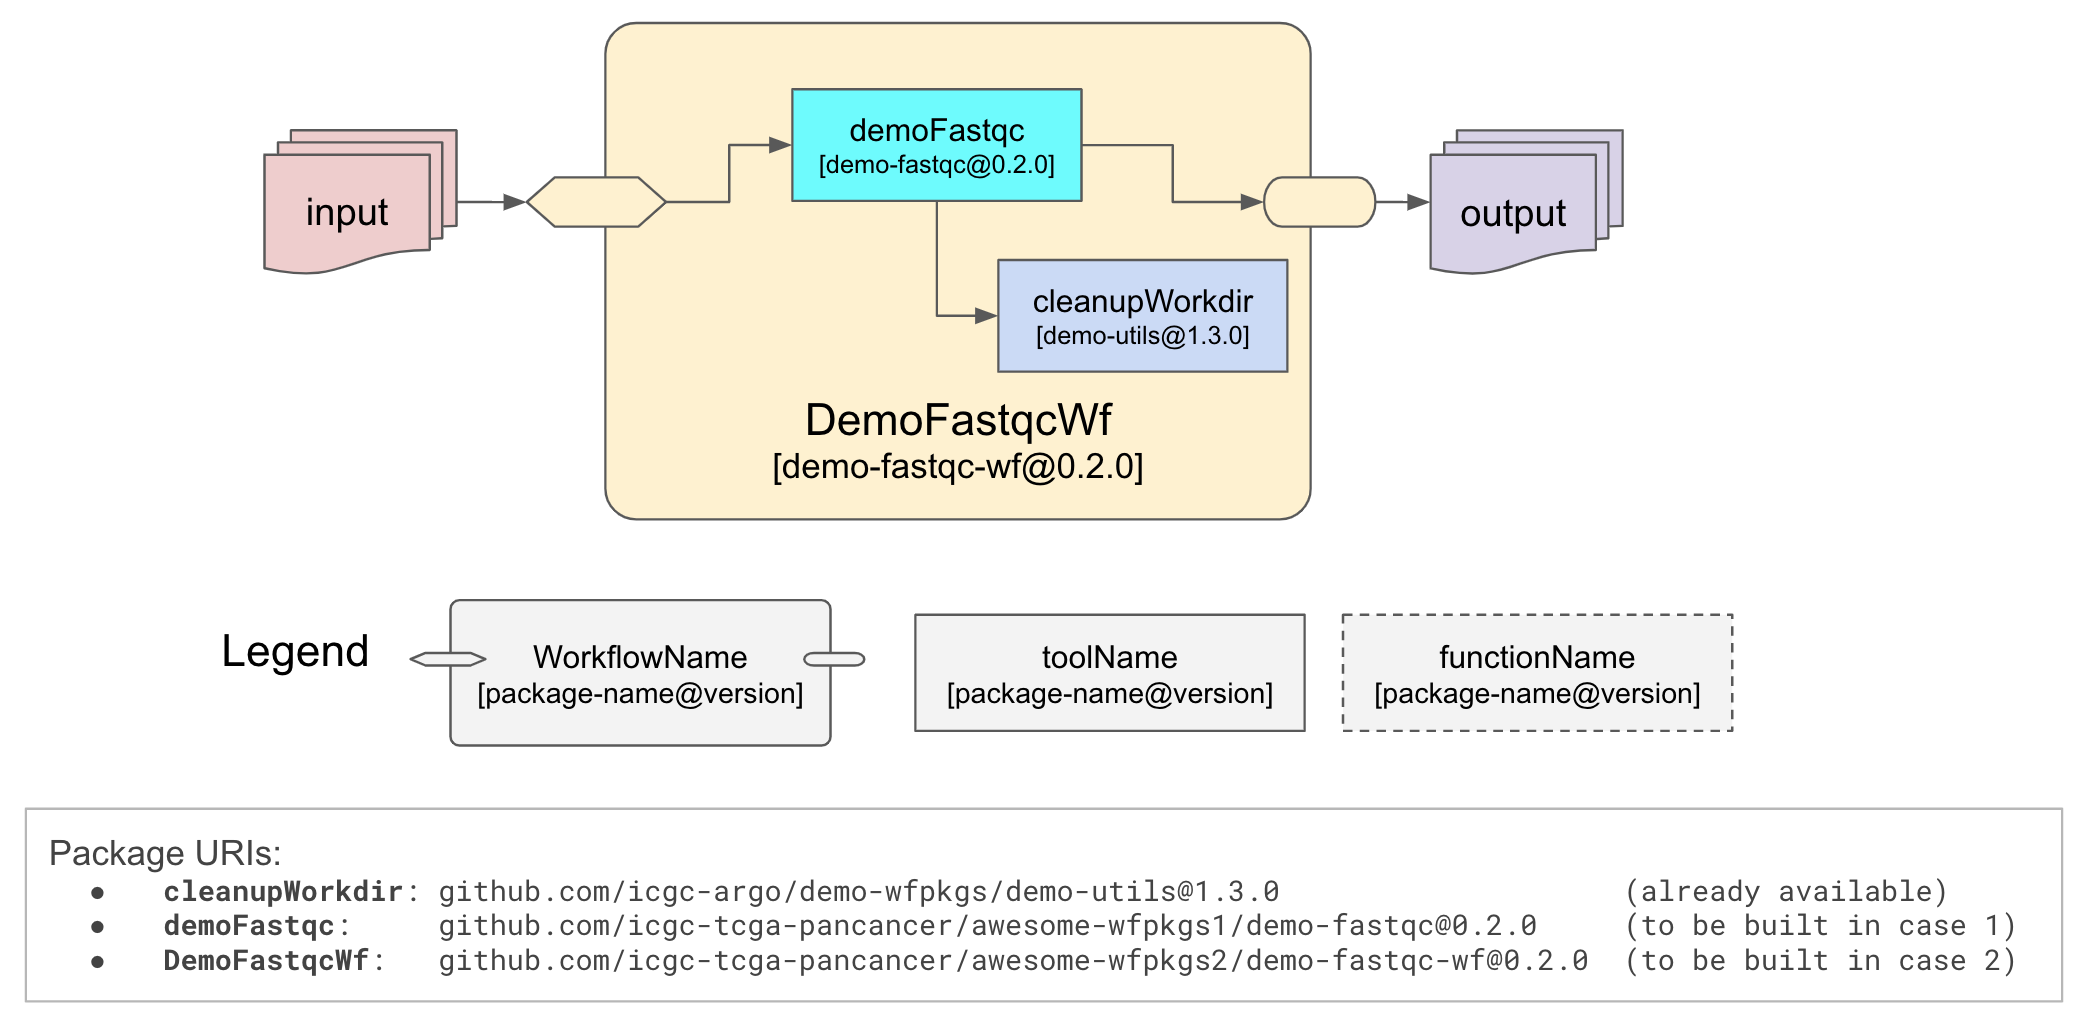
Our objective is to create a workflow that uses FASTQC tool to produce QC metrics for input sequencing
reads. A utility cleanupWorkdir tool is also used to remove unneeded intermediate files. The diagram below
illustrates how the workflow is structured, basically, workflow package demo-fastqc-wf@0.2.0 contains two
tool packages: demo-fastqc@0.2.0 and demo-utils@1.3.0. We will be creating demo-fastqc@0.2.0 and
demo-fastqc-wf@0.2.0 while demo-utils@1.3.0 is already available, we just need to import it as a dependency.
The packages created by the demo cases can be found at: https://github.com/ICGC-TCGA-PanCancer/awesome-wfpkgs1/releases/tag/demo-fastqc.v0.2.0 and https://github.com/ICGC-TCGA-PanCancer/awesome-wfpkgs2/releases/tag/demo-fastqc-wf.v0.2.0 for your reference.
NOTE: You are encouraged to follow these steps to create your own tool / workflow packages. Simply replacing
the GitHub organization ICGC-TCGA-PanCancer used here by your own GitHub account, it should just work.
Demo use case 1: create and publish a demo tool package
Prepare a GitHub repository
Before you start, please make sure you create a repository with name at your choice (in the demo let’s
use awesome-wfpkgs1) under a GitHub organization account you have admin access or your personal account
(here we use ICGC-TCGA-PanCancer).
You also need to create a Personal Access Token (PAT) in order to access GitHub Container Registry,
follow these steps: your account => Settings => Developer settings => Personal access tokens =>
Generate new token. Please select write:packages scope for the token.
Once PAT is created, please copy the token and add it to the repository you created above. Here are the
steps to go through: Settings (under the repository page) => Secrets => New repository secret.
For name, please use CR_PAT, value is the PAT you just created.
GitHub Actions greatly helps continuous integration (CI) and continuous delivery (CD) automation.
CI/CD is an integral part of the workflow package development life cycle. To enable GitHub Actions
for your organization: Settings => Actions => Allow all actions. WFPM CLI generated workflow
package templates include all necessary components to perform CI/CD with no work required from you.
Initialize a project directory for developing/managing packages
wfpm init
Please follow the prompt to provide necessary information. Most important information
includes Project name (this is also the GitHub repo name, please make sure it matches what you have created at step 1. Here we use awesome-wfpkgs1) and GitHub account (we use ICGC-TCGA-PanCancer).
Once completed, you should see something similar as below:
Project initialized in awesome-wfpkgs1
Git repo initialized and first commit done. When ready, you may push to github.com using:
git push -u origin main
When you are ready, as suggested above you can push the code to GitHub. Upon push received at GitHub, CI/CD process will be automatically triggered. You should see CI tests pass, which indicates everything went well.
Create your first tool package
wfpm new tool demo-fastqc
We use the bioinformatics tool fastqc as an example here. You
can pretty much use the default values in the prompt to advance forward, except for using 0.2.0 for package version. Upon completion,
you should see a message like New package created in: demo-fastqc. Starting template added and committed to git. Please continue working on it. Template code is added to the demo-fastqc@0.2.0 branch,
and WFPM CLI sets the newly created package as currently worked on package, you may verify it by
running:
wfpm workon
You should see the following message:
Packages released: <none>
Packages in development:
  demo-fastqc: 0.2.0
Package being worked on: demo-fastqc@0.2.0
When creating your own package, the generated package template gives you the starting point, change the
code as needed. In this demo, the generated demo-fastqc pacakge is already fully functional, we will
just push the code to GitHub:
git push -u origin demo-fastqc@0.2.0
Upon receiving the push, GitHub will automatically start CI/CD via GitHub Actions. If the test
passes, you may create a Pull Request (PR) against the main branch to start the reviewing process.
NOTE: a newly created GitHub container image by default is private, you will need Admin access to make
it public so that anyone is able to pull the image. In this demo case, it can be done on this page:
https://github.com/orgs/ICGC-TCGA-PanCancer/packages/container/awesome-wfpkgs1.demo-fastqc/settings (change the URL
as needed to match your org and repo), click on Change Visibility, then choose Public and confirm.
Publish your first tool package
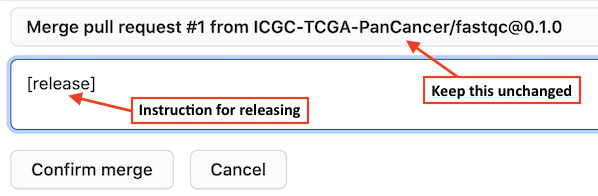
When you merge the above PR, as part of the comment, you may type a special
instruction [release] to let GitHub Actions start the release process, as shown in
the screenshot below. With this GitHub will first merge the demo-fastqc@0.2.0 branch to the main branch,
then starts the release process, once tests are successful, a release of your first tool package
will be made automatically.
The release should be available at: https://github.com/ICGC-TCGA-PanCancer/awesome-wfpkgs1/releases/tag/demo-fastqc.v0.2.0 and can be imported and used by anyone (of course including yourself) in their workflows. How to do that? Please continue to the next demo use case.
Demo use case 2: create and publish a workflow package
In this demo we will be creating a new workflow package that makes use of the demo-fastqc tool package
we created in demo use case 1 (by now it has been released here)
and another utility package published
here: https://github.com/icgc-argo/demo-wfpkgs/releases/tag/demo-utils.v1.3.0
Prepare another GitHub repository
Similar to the first step of demo use case 1, create another repository (here we use awesome-wfpkgs2)
in the same GitHub organization, add a PAT to it as a secret and name it CR_PAT.
Initialize a project directory for developing/managing packages
wfpm init
Same as in the previous demo, following the prompt to provide necessary information of the new project.
For Project name and GitHub account, we use awesome-wfpkgs2 and ICGC-TCGA-PanCancer respectively
for this demo.
Upon completion, the scaffold of our second project will be generated and first git commit will be done automatically. You may push the code to GitHub once verified everything is fine.
Create your first workflow package
Let’s name the first workflow package demo-fastqc-wf:
wfpm new workflow demo-fastqc-wf
You may response most of the fields with the default values, except for using 0.2.0 for package version. Notice
that below are dependencies the new workflow requires. Please replace icgc-tcga-pancancer with your own GitHub org
name so the tool package you just released will be used.
github.com/icgc-tcga-pancancer/awesome-wfpkgs1/demo-fastqc@0.2.0github.com/icgc-argo/demo-wfpkgs/demo-utils@1.3.0
wfpm will automatically install and test dependent packages in a temporary directory, once verified
all dependencies tested successfully, they will be copied over to the project space. You should see the
message: New package created in: demo-fastqc-wf. Starting template added and committed to git. Please continue working on it. Template code is added to the demo-fastqc-wf@0.2.0 branch,
and WFPM CLI sets the newly created package as currently worked on package, you may verify it by
running:
wfpm workon
The auto-generated workflow code is fully functional, you may invoke tests as:
wfpm test
This is equivalent to running the tests using Nextflow command directly:
cd demo-fastqc-wf/tests
nextflow run checker.nf -params-file test-job-1.json
nextflow run checker.nf -params-file test-job-2.json
You should see the test run successfully. We now simply push the code to GitHub:
git push -u origin demo-fastqc-wf@0.2.0
CI/CD process will be triggered on the new branch similar to demo 1. Once tests pass, you may create a PR as usual.
Publish your first workflow package
When merge the PR, type the special instruction [release] in the comment (similar as in the previous demo)
to trigger the CI/CD release process via GitHub Actions. Once released, the demo workflow package will be available at: https://github.com/ICGC-TCGA-PanCancer/awesome-wfpkgs2/releases/tag/demo-fastqc-wf.v0.2.0
Summary
By now, you should have a clear picture how WFPM CLI helps to create independent workflow packages and how these packages may be used/reused as building blocks to build larger workflows.
In addition to the packages created by the demo use cases, some more packages are available at: https://github.com/icgc-argo/demo-wfpkgs for your reference.
Basic Concepts
About WFPM projects
A WFPM project is a folder containing necessary WFPM configuration and workflow source code for WFPM packages. A project may contain one or more packages.
As workflow source code is typically managed by version control systems, such as, Git. A source repository may contain one and only one WFPM project. The WFPM project root directory is the root directory of its source repository. As such, WFPM project shares the same name as the repository.
The following example shows a typical directory layout of a WFPM project. Here the project
is named as my-wfpm-project (same as the source code repository), which contains one
WFPM package named demo-package.
my-wfpm-project                      # name of the WFPM project, also the repo name
├── .gitignore
├── .wfpm                            # WFPM project configuration file
├── .github
│   └── workflows
│       └── build-test-release.yml   # GitHub Actions code for automated CI/CD
├── LICENSE
├── LICENSE-short
├── README.md
├── demo-package                     # folder for the package named 'demo-package'
│   ├── pkg.json                     # pkg.json keeps basic package info
│   ├── main.nf                      # package entry script
│   ├── nextflow.config              # package nextflow default configuration
│   ├── modules                      # a package may optionally have local modules
│   │   ├── <local_module_1>
│   │   └── <local_module_2>
│   └── tests                        # folder for tests
│       ├── checker.nf               # test launcher script
│       └── test-job-1.json          # test job 1
└── wfpr_modules                     # folder to keep dependent packages
    ├── <dependent_package_1>
    ├── <dependent_package_2>
    └── README.md
The project layout can be generated from the WFMP CLI tool, users don’t need to worry about creating it. More details on creating WFPM project and package are available at WFPM CLI General Usage.
Note that even though a WFPM project may contain source code for multiple packages, each package will be developed, tested and released independently to ensure clean decoupling, self-sufficiency and portability. More on this can be found at Package releases.
About packages
A package is a directory, described by a pkg.json file, containing one or more
modules that can be imported into a workflow codebase. pkg.json file records basic
information of the package, such as: package name, version, main entry point, source
code repository etc. More information about pkg.json can be found
at Create a new tool package.
A package can be in one of the following formats:
a folder containing a
pkg.jsonfile and necessary workflow script file(s).a tarball containing (a).
a URL that resolves to (b).
a
<repo_host_domain>/<repo_name>/<pkg_name>@<version>string represents a released package on the source code control server with a release tag<pkg_name>.v<version>. A tarball named<pkg_name>.v<version>.tar.gzas in (b) is available as a release asset for download.a
<repo_host_domain>/<repo_name>/<pkg_name>@<version>_<commit_hash>string represents an in-development package on the source code control server with the specifiedcommit_hashon a branched named<pkg_name>@<version>.
About modules
A module is a workflow script file that defines one or more of these items:
A
toolthat is a single step of computation. It’s known as aprocessin Nextflow, atoolin CWL or ataskin WDL.A
workflowthat consists of one or more steps of computation, each of the steps is an execution of atooldescribed in previous point.A
functionthat takes inputs (in the form of variables: string, number, list, map etc), process them and return a result, which is much the same as functions in any general-purpose programming languages. System built-in functions are supported in Nextflow and WDL, however, only Nextflow supports user-defined functions.
tool, workflow and function are referenced by their names and are exposed via the
package’s main entry script defined in pkg.json that ultimately makes them ready to be
imported into another workflow codebase.
Package releases
Packages are released via facilities provided by source code control systems,
such as GitHub. For common software releases, GitHub allows the user
to choose a release version and write up release note, then it will create
a Git tag using the release version and generate two default release
assets, ie, source code zip and tarball files.
Since a WFPM project source code repository may contain multiple packages,
when a package is being released, only source code artifacts related to the
package to be released should be included in the release tarball. This is
achieved by a package release creation process as part of the GitHub Actions
based continuous delivery (CD). The release tarball is named as
<package>.v<version>.tar.gz and made available as a release asset.
As another release asset, a pkg-release.json file is generated. In addition
to information derived from pkg.json, the pkg-release.json file also
records the Git commit hash from which the release tag was made and the sha256
checksum of the release tarball. For tool packages, the associated container
image sha256 digest is recorded as well. This gives maximized transparency for
reproducibility and safeguard against possible (accidental or deliberate) alteration.
A package release tag is formed by combining package name and version string,
as in <package>.v<version>. This allows a single repository to support
releases of multiple packages without interfering each other.
Note: semantic versioning is highly recommended for versioning your pacakges.
Permissible string patterns for artifact names
Artifact |
Pattern |
|---|---|
project |
|
package |
|
tool |
|
workflow |
|
function |
|
version |
|
release tag |
|
release tarbal |
|
commit hash |
|
package URI |
|
dev package URI |
|
Dependencies
One of the major design goals of WFPM is to support workflow code reuse. Being able
to import code developed by others as dependencies is a native feature in many general-purpoase
programming languages. All WFPM packages are uniformly structured and well tested before
releasing. This makes the packages readily importable into other users’ codebase. For the
importer side, a package’s dependencies can be declared in the pkg.json file as shown
in the example below:
"dependencies": [
    "github.com/icgc-argo/data-processing-utility-tools/payload-add-uniform-ids@0.1.1",
    "github.com/icgc-argo/data-processing-utility-tools/helper-functions@1.0.0",
    "github.com/icgc-argo/data-processing-utility-tools/cleanup-workdir@1.0.0"
]
Dependent packages are specified using their package URIs. To ensure maximized reproducibility, WFPM requires specifying each dependency to a particular version.
Dependency installation is fully managed by the WFPM CLI tool. Before proceeding with
installation, the CLI tool resolves dependecies (and their dependencies recursively)
to build a complete dependency graph. All dependencies will be installed under wfpr_modules
directory. At runtime, dependencies will be imported from this directory, no need to fetch
from any remote resources.
Note
Fun fact: WFPM supports multiple versions of the same package coexist as dependencies, thanks to the fact WFPM requires importer always explicitly specify a particular version of any dependency. In WFPM, the well-known diamond dependency problem is nonexistence.
Similar approach is taken by Go: The need for major version suffixes is one of the ways Go modules differs from most other dependency management systems.
WFPM CLI General Usage
WFPM CLI overview
WFPM CLI is a command line tool that provides full lifecycle assistance to develop WFPM packages. For installation, please follow the instruction here.
For general usage and available commands, just run wfpm with the --help option:
wfpm --help
Usage: wfpm [OPTIONS] COMMAND [ARGS]...

Options:
  -d, --debug / --no-debug  Show debug information in STDERR.
  -v, --version             Show wfpm version.
  --help                    Show this message and exit.

Commands:
  init       Start a workflow package project with necessary scaffolds.
  install    Install dependencies for the package currently being worked on.
  list       List local and installed dependent packages.
  new        Start a new package with necessary scaffolds.
  nextver    Start a new version of a released or in development package.
  outdated   List outdated dependent packages.
  test       Run tests.
  uninstall  Uninstall packages.
  workon     Start work on a package, display packages released or in dev.
Usage info for each command is also available, for example, usage for the new
command:
wfpm new --help
Initialize a WFPM project
To create a new WFPM project, please use the wfpm init command which will
start an interactive step-by-step questionnaire to collect information for the
new WFPM project. As the example showing below:
Please provide project information. Default value is in [] for each question, type your answer or hit enter to accept default.
? Project name / GitHub repo name (project_slug) [repo-name]: my-awesome-wfpm-project
? Project title [Awesome Workflow Packages]:
? Organization or your GitHub account (under which source code is hosted) [github-account]: your-github-account
? Organization or your name (used as copyright owner in License) [Your Organization Name]:
? Open source license: MIT
A summary of the collected info will show before proceeding with project creation, it may look like the example below:
{
    "project_slug": "my-awesome-wfpm-project",
    "project_title": "Awesome Workflow Packages",
    "github_account": "your-github-account",
    "full_name": "Your Organization Name",
    "open_source_license": "MIT"
}
With the above info, upon successful creation, the new WFPM project will be in
a directory named as my-awesome-wfpm-project. The directory layout should be
similar to the example shown here. Essential
info about the project is kept in the .wfpm configuration file (in YAML format).
When the project template is created, WFPM CLI will also initialize the new directory to be a Git repository, add all generated content to it and make the first commit.
After verifying everything is expected, you may push the source code to the remote
repo server, ie, github.com. Note that currently only GitHub is supported. Please
create the repository named as my-awesome-wfpm-project under your-github-account
before running the following command:
git push -u origin main
Note that the default Git branch is main (not master).
Create a new tool package
Create starter templates
To create a new tool package, please make sure the current work dir is at the root
of the WFPM project. Assuming my-awesome-tool is the new tool package name,
you may then run:
wfpm new tool my-awesome-tool
Similar to project creation, information about the new tool package will be collected
step-by-step interactively. Assume you’d like to start with a base docker image that
contains the popular fastqc tool, you may specify pegi3s/fastqc:0.11.9 as the base
image. Most of the fields you may choose the provided default value. An example summary
of the collected info is shown below:
{
    "full_name": "Your name",
    "email": "you@example.com",
    "pkg_version": "0.1.0",
    "pkg_description": "My sequence QC tool",
    "keywords": "bioinformatics, sequence, qc metrics",
    "docker_base_image": "pegi3s/fastqc:0.11.9",
    "container_registry": "ghcr.io",
    "registry_account": "your-github-account",
    "dependencies": "",
    "devDependencies": ""
}
Upon successful creation, you should see a message like below:
New package created in: my-awesome-tool. Starting template added and committed to git. Please continue working on it.
Here is how the directory layout looks like:
my-awesome-tool
├── Dockerfile
├── main.nf
├── main.py
├── nextflow.config
├── pkg.json
├── tests
│   ├── checker.nf
│   ├── expected
│   │   ├── expected.test_rg_3.bam
│   │   └── expected.test_rg_3_fastqc.out.gz
│   ├── input
│   │   ├── README.md
│   │   └── test_rg_3.bam
│   ├── nextflow.config
│   ├── test-job-1.json
│   ├── test-job-2.json
│   └── wfpr_modules -> ../wfpr_modules
└── wfpr_modules -> ../wfpr_modules
Please note that the code for the new package resides on a new branch named as
my-awesome-tool@0.1.0 (pattern: <pkg_name>@<version>). Development should continue
on this branch utill it’s merged into the main branch after PR (pull request)
creation and code review approval.
Implement the tool
In WFPM, all tools are required to have their executables containerized. Currently
only Docker is supported. The auto-generated Dockerfile starts from the specified
base image, and copies the generated Python main.py script into the image. These files
are meant to give you a starting point to implement your own functionalities for the
new tool.
You may build the Docker image locally or push the code to GitHub which will build the Docker image via GitHub Actions CI/CD script, for simplicity, the latter is suggested. Additionally, GitHub Actions CI/CD script also automatically invokes tests.
Write tests for the tool
The auto-generated test code should serve as a good start for you to implement your own
tests. Tests are invoked by the checker.nf script. Tests themselves are parameter files
named with prefix: test-.
Create a pull request and start code review
Same as the common practice in software development, once the code is ready for peer review, a PR can be created and a reviewer or reviewers may be assigned. Review comments should be addressed and all tests should pass before the PR can be approved.
Continue on to Release a package section for the next step.
Create a new workflow package
Creating a new workflow package is very similar as that for a tool package described above. The major differences include:
workflow package usually imports tool packages for its processing steps.
workflow package does not have directly assocated container images.
To create a new workflow package named as my-awesome-workflow, run:
wfpm new workflow my-awesome-workflow
Assume the new workflow package needs to run a QC step using the fastqc tool, we can
specify a dependency of the tool package we just built and released in the previous section.
We may also take the advantage of the helper-functions package
released by ICGC ARGO to retrive secondary files.
To import them to the new workflow package, we specify two dependencies:
github.com/icgc-argo/data-processing-utility-tools/helper-functions@1.0.1
github.com/your-github-account/my-awesome-wfpm-project/my-awesome-tool@0.1.0
Below is how the summary of collected information may look like:
{
    "full_name": "Your name",
    "email": "you@example.com",
    "pkg_version": "0.1.0",
    "pkg_description": "My DNA Seq Processing Workflow",
    "keywords": "bioinformatics, dna-seq, alignment",
    "dependencies": "github.com/icgc-argo/data-processing-utility-tools/helper-functions@1.0.1, github.com/your-github-account/my-awesome-wfpm-project/my-awesome-tool@0.1.0",
    "devDependencies": ""
}
The layout of the generated new workflow package directory my-awesome-workflow and
installed dependency directory wfpr_modules may look as below:
my-awesome-workflow
├── main.nf
├── pkg.json
├── nextflow.config
├── tests
│   ├── checker.nf
│   ├── expected
│   │   ├── expected.test_rg_3.bam
│   │   └── expected.test_rg_3_fastqc.out.gz
│   ├── input
│   │   ├── README.md
│   │   └── test_rg_3.bam
│   ├── nextflow.config
│   ├── test-job-1.json
│   ├── test-job-2.json
│   └── wfpr_modules -> ../wfpr_modules
└── wfpr_modules -> ../wfpr_modules
wfpr_modules
├── README.md
└── github.com
    └── icgc-argo
    │   ├── data-processing-utility-tools
    │   │   └── helper-functions@1.0.1
    └── your-github-account
        └── my-awesome-wfpm-project
            └── my-awesome-tool@0.1.0
Similar to creating a new tool package, generated code for the new workflow package resides
on a new branch named as my-awesome-workflow@0.1.0. Please follow similar process as
described in Create a new tool package section to continue
the development of the new workflow package.
Release a package
WFPM packages should only be released when the package code PR has been approved and merged
into the main branch.
The GitHub Actions script generated by the WFPM CLI tool provides a convenient feature for
automated package release creation. To take the advantage of this feature, when you merge the
PR, in the box for comment you may type a special instruction [release] to let GitHub Actions
start the release process, as shown in the screenshot below. With this GitHub will first merge
the package branch to the main branch, then starts the release process, once tests are successful,
a release of the package will be made automatically.
Once a package is released, two files: release tarball and pkg-release.json will be generated
and made available for download as release assets. More details on this can be found at
Package releases section.
Update an existing package
To update an existing package, for example, my-awesome-tool you may use the nextver
command as:
wfpm nextver my-awesome-tool@0.1.0 0.2.0
With this WFPM CLI will start from the git commit referenced by 0.1.0 tag to create
a new package branch named as my-awesome-tool@0.2.0, update the version number from
0.1.0 to 0.2.0 in the pkg.json and main.nf files, and lastly commit the changes
to git. From here, you should follow a similar process as described in creating new
packages to continue the development and eventually release the updated package.
Switch between in-dev packages
You may have multiple packages in active development concurrently. To switch between these
in-dev packages, you may use the workon command.
The workon command may also be used to display statuses of all packages, for example,
wfpm workon may give the following output:
Packages released:
  demo-aligned-seq-qc: 1.1.0, 1.0.0
  demo-bam-merge-sort-markdup: 1.12.1, 1.12.0, 1.11.1
  demo-bwa-mem-aligner: 1.22.0, 1.21.0, 1.20.2, 1.20.1, 1.20.0, 1.12.2, 1.12.1
  demo-dna-seq-alignment-wf: 1.7.2, 1.7.1, 1.7.0, 1.6.0
  demo-dna-seq-processing-wf: 1.7.2-1.3.2, 1.7.1-1.3.1, 1.7.0-1.3.0, 1.6.0-1.2.0
  demo-utils: 1.3.0, 1.2.0, 1.1.0, 1.0.3, 1.0.2, 1.0.1, 1.0.0
Packages in development:
  abc: 0.1.0
Package being worked on: <none>
To start working on the abc package, simply run:
wfpm workon abc
With that, the current branch will be switched to abc@0.1.0, you may now continue
to work on it.